Sunday, April 26, 2020

Snmpcheck


"snmpcheck is a free open source utility to get information via SNMP protocols. It works fine against Windows, Linux, Cisco, HP-UX, SunOS systems and any devices with SNMP protocol support. It could be useful for penetration testing or systems monitoring. snmpcheck has been tested on GNU/Linux, *BSD, Windows systems and Cygwin. snmpcheck is distributed under GPL license and based on Athena-2k script by jshaw. " read more...

Website: http://www.nothink.org/perl/snmpcheck


Related posts


  1. Hacking Growth Pdf
  2. Hacking To The Gate
  3. Hacking Background
  4. Certificacion Ethical Hacking
  5. Hacking Etico
  6. Servicio Hacker
  7. Hacking Ético Curso
  8. Hacking Linux Distro
  9. Hacking Etico

CSRF Referer Header Strip

Intro

Most of the web applications I see are kinda binary when it comes to CSRF protection; either they have one implemented using CSRF tokens (and more-or-less covering the different functions of the web application) or there is no protection at all. Usually, it is the latter case. However, from time to time I see application checking the Referer HTTP header.

A couple months ago I had to deal with an application that was checking the Referer as a CSRF prevention mechanism, but when this header was stripped from the request, the CSRF PoC worked. BTW it is common practice to accept empty Referer, mainly to avoid breaking functionality.

The OWASP Cross-Site Request Forgery (CSRF) Prevention Cheat Sheet tells us that this defense approach is a baaad omen, but finding a universal and simple solution on the Internetz to strip the Referer header took somewhat more time than I expected, so I decided that the stuff that I found might be useful for others too.

Solutions for Referer header strip

Most of the techniques I have found were way too complicated for my taste. For example, when I start reading a blog post from Egor Homakov to find a solution to a problem, I know that I am going to:
  1. learn something very cool;
  2. have a serious headache from all the new info at the end.
This blog post from him is a bit lighter and covers some useful theoretical background, so make sure you read that first before you continue reading this post. He shows a few nice tricks to strip the Referer, but I was wondering; maybe there is an easier way?

Rich Lundeen (aka WebstersProdigy) made an excellent blog post on stripping the Referer header (again, make sure you read that one first before you continue). The HTTPS to HTTP trick is probably the most well-known one, general and easy enough, but it quickly fails the moment you have an application that only runs over HTTPS (this was my case).

The data method is not browser independent but the about:blank trick works well for some simple requests. Unfortunately, in my case the request I had to attack with CSRF was too complex and I wanted to use XMLHttpRequest. He mentions that in theory, there is anonymous flag for CORS, but he could not get it work. I also tried it, but... it did not work for me either.

Krzysztof Kotowicz also wrote a blog post on Referer strip, coming to similar conclusions as Rich Lundeen, mostly using the data method.

Finally, I bumped into Johannes Ullrich's ISC diary on Referer header and that led to me W3C's Referrer Policy. So just to make a dumb little PoC and show that relying on Referer is a not a good idea, you can simply use the "referrer" meta tag (yes, that is two "r"-s there).

The PoC would look something like this:
<html>
<meta name="referrer" content="never">
<body>
<form action="https://vistimsite.com/function" method="POST">
<input type="hidden" name="param1" value="1" />
<input type="hidden" name="param2" value="2" />
...
</form>
<script>
document.forms[0].submit();
</script>
</body>
</html>

Conclusion

As you can see, there is quite a lot of ways to strip the Referer HTTP header from the request, so it really should not be considered a good defense against CSRF. My preferred way to make is PoC is with the meta tag, but hey, if you got any better solution for this, use the comment field down there and let me know! :)

Continue reading


  1. Hacking Web Sql Injection
  2. Que Es Un Hacker
  3. Hacking Ético Con Herramientas Python Pdf
  4. Software Hacking
  5. Web Hacking 101
  6. Hackers Informaticos Contactar
  7. Hacking Wifi Windows
  8. Hacking Raspberry Pi

Takeover - SubDomain TakeOver Vulnerability Scanner


Sub-domain takeover vulnerability occur when a sub-domain (subdomain.example.com) is pointing to a service (e.g: GitHub, AWS/S3,..) that has been removed or deleted. This allows an attacker to set up a page on the service that was being used and point their page to that sub-domain. For example, if subdomain.example.com was pointing to a GitHub page and the user decided to delete their GitHub page, an attacker can now create a GitHub page, add a CNAME file containing subdomain.example.com, and claim subdomain.example.com. For more information: here


Installation:
# git clone https://github.com/m4ll0k/takeover.git
# cd takeover
# python takeover.py
or:
wget -q https://raw.githubusercontent.com/m4ll0k/takeover/master/takeover.py && python takeover.py


Related articles
  1. Mind Hacking
  2. Que Es Hacking Etico
  3. Hacking Software
  4. Growth Hacking Libro
  5. Que Significa Hat

Ophcrack


" Ophcrack is an open source (GPL license) program that cracks Windows LM hashes using rainbow tables. The program includes the ability to import the hashes from a variety of formats, including dumping directly from the SAM files of Windows. There is also a Live CD version which automates the retrieval, decryption, and cracking of passwords from a Windows system. Rainbow tables for LM hashes of alphanumeric passwords are provided for free by the developers. These tables can crack 99.9% of alphanumeric passwords of up to 14 characters in usually a few seconds, and at most a few minutes. Larger rainbow tables (for LM hashes of passwords with all printable characters, including symbols and space) are available for purchase from Objectif Securité. Starting with version 2.3, Ophcrack also cracks NT hashes. This is necessary if generation of the LM hash is disabled (this is default on Windows Vista), or if the password is longer than 14 characters (in which case the LM hash is not stored)." read more...

Website: http://ophcrack.sourceforge.net

Related posts

Saturday, April 25, 2020

HaCode - FUD Backdoor Generator / Remote Administration Tool

Continue reading

  1. Hacking To The Gate
  2. Wargames Hacking
  3. Linux Hacking Distro
  4. Hacking Websites
  5. Hacking Virus
  6. Curso Hacking Etico
  7. Hacking Growth Sean Ellis
  8. Growth Hacking Instagram
  9. Hacking Ético Con Herramientas Python Pdf

The Incident Response Challenge 2020 — Win $5,000 Prize!

Cybersecurity firm Cynet today announced the launch of a first of its kind challenge to enable Incident Response professionals to test their skills with 25 forensic challenges that were built by top researchers and analysts. The challenge is available on https://ift.tt/2Vrf4e0 and is open to anyone willing to test his or her investigation skills, between April 21st and May

via The Hacker News
More articles

OWASP Announcement

🕬  OWASP Announcement:


The OWASP Foundation has been chosen to be 1 of 50 Open Source Organizations to participate in the inaugural year of the Google Season of Docs program.

The goal of Season of Docs is to provide a framework for technical writers and open source projects to work together towards the common goal of improving an open source project's documentation. For technical writers who are new to open source, the program provides an opportunity to gain experience in contributing to open source projects. For technical writers who're already working in open source, the program provides a potentially new way of working together. Season of Docs also gives open source projects an opportunity to engage more of the technical writing community.

We would like to thank the OWASP members that donate their time and knowledge as administrators and mentors. It would not be possible if not for these individuals:
Spyros, Fabio, and Konstantinos 


Related articles
  1. Hacking 2019
  2. Growth Hacking Definicion
  3. Udemy Hacking
  4. Paginas Para Hackear
  5. Growth Hacking Marketing
  6. Chema Alonso Libros
  7. Aprender Hacking Desde Cero
  8. Clases De Hacker
  9. Hacking Web
  10. Hacking Traduccion
  11. Windows Hacking

Ophcrack


" Ophcrack is an open source (GPL license) program that cracks Windows LM hashes using rainbow tables. The program includes the ability to import the hashes from a variety of formats, including dumping directly from the SAM files of Windows. There is also a Live CD version which automates the retrieval, decryption, and cracking of passwords from a Windows system. Rainbow tables for LM hashes of alphanumeric passwords are provided for free by the developers. These tables can crack 99.9% of alphanumeric passwords of up to 14 characters in usually a few seconds, and at most a few minutes. Larger rainbow tables (for LM hashes of passwords with all printable characters, including symbols and space) are available for purchase from Objectif Securité. Starting with version 2.3, Ophcrack also cracks NT hashes. This is necessary if generation of the LM hash is disabled (this is default on Windows Vista), or if the password is longer than 14 characters (in which case the LM hash is not stored)." read more...

Website: http://ophcrack.sourceforge.net

Related word

Friday, April 24, 2020

DOWNLOAD SQLI HUNTER V1.2 – SQL INJECTION TOOL

SQLi hunter is a tool to scan for an SQLi Injection vulnerability in a website on auto-pilot. It automates the search of SQLi vulnerable links from Google using different dorks. SQLi hunter can also find admin panel page of any website by using some predefined admin page lists. Download SQLi hunter v1.2.

FEATURES

– Supports 500 results
– Url List can be Imported / Exported
– The setting for connection timeout
– Proxy Settings
If you're not totally satisfied with this tool, you can try other sql injection tools like havij , sqli dumper and sqlmap. These tools are incredibly super flexible with their advanced injection features.

DOWNLOAD SQLI HUNTER V1.2

Related links
  1. Ethical Hacking Course
  2. Phishing Hacking
  3. Windows Hacking
  4. Cosas De Hackers
  5. Hacking Cracking
  6. Hacker Definicion
  7. Ethical Hacking Curso
  8. Ingeniería Social El Arte Del Hacking Personal
  9. Brain Hacking
  10. Curso Hacking Gratis
  11. Informatico Hacker

Reversing Some C++ Io Operations

In general decompilers are not friendly with c++ let's analyse a simple program to get familiar with it.
Let's implement a simple code that loads a file into a vector and then save the vector with following functions:

  • err
  • load
  • save
  • main


Lets identify the typical way in C++ to print to stdout with the operator "<<"


The basic_ostream is initialized writing the word "error" to the cout, and then the operator<< again to add the endl.


The Main function simply calls  "vec = load(filename)"  but the compiler modified it and passed the vector pointer as a parámeter. Then it bulds and prints "loaded  " << size << " users".
And finally saves the vector to /tmp/pwd and print "saved".
Most of the mess is basically the operator "<<" to concat and print values.
Also note that the vectors and strings are automatically deallocated when exit the function.


And here is the code:


Let's take a look to the load function, which iterates the ifs.getline() and push to the vector.
First of all there is a mess on the function definition, __return_storage_ptr is the vector.
the ifstream object ifs is initialized as a basic_ifstream and then operator! checks if it wasn't possible to open the file and in that case calls err()
We see the memset and a loop, getline read a cstr like line from the file, and then is converted to a string before pushing it to the vector. lVar1 is the stack canary value.

In this situations dont obfuscate with the vector pointer vec initialization at the begining, in this case the logic is quite clear.


The function save is a bit more tricky, but it's no more than a vector iteration and ofs writing.
Looping a simple "for (auto s : *vec)" in the decompiler is quite dense, but we can see clearly two write, the second write DAT_0010400b is a "\n"


As we see, save implememtation is quite straightforward.


Related links
  1. Hacking-Lab
  2. Hacking Wifi
  3. Servicio Hacker

Thursday, April 23, 2020

DOS (Denial Of Service) Attack Tutorial Ping Of Death ;DDOS

What is DoS Attack?

DOS is an attack used to deny legitimate users access to a resource such as accessing a website, network, emails, etc. or making it extremely slow. DoS is the acronym for Denial oService. This type of attack is usually implemented by hitting the target resource such as a web server with too many requests at the same time. This results in the server failing to respond to all the requests. The effect of this can either be crashing the servers or slowing them down.


Cutting off some business from the internet can lead to significant loss of business or money. The internet and computer networks power a lot of businesses. Some organizations such as payment gateways, e-commerce sites entirely depend on the internet to do business.

In this tutorial, we will introduce you to what denial of service attack is, how it is performed and how you can protect against such attacks.

Topics covered in this tutorial

Types of Dos Attacks

There are two types of Dos attacks namely;

  • DoS– this type of attack is performed by a single host
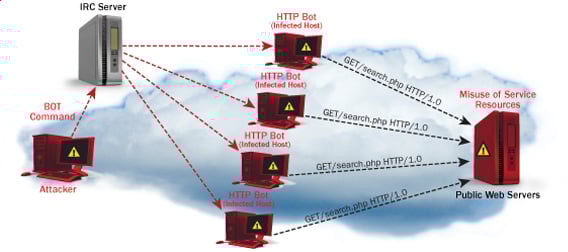
  • Distributed DoS– this type of attack is performed by a number of compromised machines that all target the same victim. It floods the network with data packets.

Ultimate guide to DoS(Denial of Service) Attacks

How DoS attacks work

Let's look at how DoS attacks are performed and the techniques used. We will look at five common types of attacks.

Ping of Death

The ping command is usually used to test the availability of a network resource. It works by sending small data packets to the network resource. The ping of death takes advantage of this and sends data packets above the maximum limit (65,536 bytes) that TCP/IP allows. TCP/IP fragmentation breaks the packets into small chunks that are sent to the server. Since the sent data packages are larger than what the server can handle, the server can freeze, reboot, or crash.

Smurf

This type of attack uses large amounts of Internet Control Message Protocol (ICMP) ping traffic target at an Internet Broadcast Address. The reply IP address is spoofed to that of the intended victim. All the replies are sent to the victim instead of the IP used for the pings. Since a single Internet Broadcast Address can support a maximum of 255 hosts, a smurf attack amplifies a single ping 255 times.  The effect of this is slowing down the network to a point where it is impossible to use it.

Buffer overflow

A buffer is a temporal storage location in RAM that is used to hold data so that the CPU can manipulate it before writing it back to the disc. Buffers have a size limit. This type of attack loads the buffer with more data that it can hold. This causes the buffer to overflow and corrupt the data it holds. An example of a buffer overflow is sending emails with file names that have 256 characters.

Teardrop

This type of attack uses larger data packets. TCP/IP breaks them into fragments that are assembled on the receiving host. The attacker manipulates the packets as they are sent so that they overlap each other. This can cause the intended victim to crash as it tries to re-assemble the packets.

SYN attack

SYN is a short form for Synchronize. This type of attack takes advantage of the three-way handshake to establish communication using TCP. SYN attack works by flooding the victim with incomplete SYN messages. This causes the victim machine to allocate memory resources that are never used and deny access to legitimate users.

DoS attack tools

The following are some of the tools that can be used to perform DoS attacks.

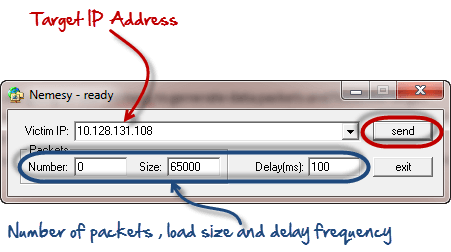
  • Nemesy– this tool can be used to generate random packets. It works on windows. This tool can be downloaded from http://packetstormsecurity.com/files/25599/nemesy13.zip.html . Due to the nature of the program, if you have an antivirus, it will most likely be detected as a virus.
  • Land and LaTierra– this tool can be used for IP spoofing and opening TCP connections
  • Blast– this tool can be downloaded from http://www.opencomm.co.uk/products/blast/features.php
  • Panther- this tool can be used to flood a victim's network with UDP packets.
  • Botnets– these are multitudes of compromised computers on the Internet that can be used to perform a distributed denial of service attack.

DoS Protection: Prevent an attack

An organization can adopt the following policy to protect itself against Denial of Service attacks.

  • Attacks such as SYN flooding take advantage of bugs in the operating system. Installing security patches can help reduce the chances of such attacks.
  • Intrusion detection systems can also be used to identify and even stop illegal activities
  • Firewalls can be used to stop simple DoS attacks by blocking all traffic coming from an attacker by identifying his IP.
  • Routers can be configured via the Access Control List to limit access to the network and drop suspected illegal traffic.

Hacking Activity: Ping of Death

We will assume you are using Windows for this exercise. We will also assume that you have at least two computers that are on the same network. DOS attacks are illegal on networks that you are not authorized to do so. This is why you will need to setup your own network for this exercise.

Open the command prompt on the target computer

Enter the command ipconfig. You will get results similar to the ones shown below

Ultimate guide to DoS(Denial of Service) Attacks

For this example, we are using Mobile Broadband connection details. Take note of the IP address. Note: for this example to be more effective, and you must use a LAN network.

 Switch to the computer that you want to use for the attack and open the command prompt

We will ping our victim computer with infinite data packets of 65500

Enter the following command

ping 10.128.131.108 –t |65500

HERE,

  • "ping" sends the data packets to the victim
  • "10.128.131.108" is the IP address of the victim
  • "-t" means the data packets should be sent until the program is stopped
  • "-l" specifies the data load to be sent to the victim

You will get results similar to the ones shown below

Ultimate guide to DoS(Denial of Service) Attacks

Flooding the target computer with data packets doesn't have much effect on the victim. In order for the attack to be more effective, you should attack the target computer with pings from more than one computer.

The above attack can be used to attacker routers, web servers etc.

If you want to see the effects of the attack on the target computer, you can open the task manager and view the network activities.

  • Right click on the taskbar
  • Select start task manager
  • Click on the network tab
  • You will get results similar to the following

Ultimate guide to DoS(Denial of Service) Attacks

If the attack is successful, you should be able to see increased network activities.


Hacking Activity: Launch a DOS attack

In this practical scenario, we are going to use Nemesy to generate data packets and flood the target computer, router or server.

As stated above, Nemesy will be detected as an illegal program by your anti-virus. You will have to disable the anti-virus for this exercise.

Ultimate guide to DoS(Denial of Service) Attacks

Enter the target IP address, in this example; we have used the target IP we used in the above example.

HERE,

  • 0 as the number of packets means infinity. You can set it to the desired number if you do not want to send, infinity data packets
  • The size field specifies the data bytes to be sent and the delay specifies the time interval in milliseconds.


Click on send button

You should be able to see the following results

Ultimate guide to DoS(Denial of Service) Attacks

The title bar will show you the number of packets sent

Click on halt button to stop the program from sending data packets.

You can monitor the task manager of the target computer to see the network activities.

Summary

  • A denial of service attack's intent is to deny legitimate users access to a resource such as a network, server etc.
  • There are two types of attacks, denial of service and distributed denial of service.
  • A denial of service attack can be carried out using SYN Flooding, Ping of Death, Teardrop, Smurf or buffer overflow
  • Security patches for operating systems, router configuration, firewalls and intrusion detection systems can be used to protect against denial of service attacks.
@EVERYTHING NT
More articles

Router-Exploit-Shovel: An Automated Application Generator For Stack Overflow Types On Wireless Routers

About Router-Exploit-Shovel
   Router-Exploit-Shovel is an automated application generation for Stack Overflow types on Wireless Routers.

   Router exploits shovel is an automated application generation tool for stack overflow types on wireless routers. The tool implements the key functions of exploits, it can adapt to the length of the data padding on the stack, generate the ROP chain, generate the encoded shellcode, and finally assemble them into a complete attack code. The user only needs to attach the attack code to the overflow location of the POC to complete the Exploit of the remote code execution.

   The tool supports MIPSel and MIPSeb.Run on Ubuntu 16.04 64bit.

Router-Exploit-Shovel's Installation
   Open your Terminal and enter these commands:
Usage

   Example: python3 Router_Exploit_Shovel.py -b test_binaries/mipseb-httpd -l test_binaries/libuClibc-0.9.30.so -o 0x00478584

Router-Exploit-Shovel's screenshot

Code structure

ROP chain generation
   This tool uses pattern to generate ROP chains. Extract patterns from common ROP exploitation procedure. Use regex matching to find available gadgets to fill up chain strings. Base64 encoding is to avoid duplicate character escapes. For example:

Attackblocks
   You can get attackblocks generated in results/attackBlocks.txt. Such as:

You might like these similar tools:
More info

  1. Hacking News
  2. Hacking Web Sql Injection
  3. Hacker Profesional
  4. Foro Hacking
  5. Aprender Seguridad Informatica
  6. Aprender Hacking Desde Cero
  7. Linux Hacking Distro
  8. Un Hacker
  9. Definicion De Cracker
  10. Hacking Course
  11. Bluetooth Hacking

Wednesday, April 22, 2020

Remot3d - An Easy Way To Exploiting

Read more


How Do I Get Started With Bug Bounty ?

How do I get started with bug bounty hunting? How do I improve my skills?


These are some simple steps that every bug bounty hunter can use to get started and improve their skills:

Learn to make it; then break it!
A major chunk of the hacker's mindset consists of wanting to learn more. In order to really exploit issues and discover further potential vulnerabilities, hackers are encouraged to learn to build what they are targeting. By doing this, there is a greater likelihood that hacker will understand the component being targeted and where most issues appear. For example, when people ask me how to take over a sub-domain, I make sure they understand the Domain Name System (DNS) first and let them set up their own website to play around attempting to "claim" that domain.

Read books. Lots of books.
One way to get better is by reading fellow hunters' and hackers' write-ups. Follow /r/netsec and Twitter for fantastic write-ups ranging from a variety of security-related topics that will not only motivate you but help you improve. For a list of good books to read, please refer to "What books should I read?".

Join discussions and ask questions.
As you may be aware, the information security community is full of interesting discussions ranging from breaches to surveillance, and further. The bug bounty community consists of hunters, security analysts, and platform staff helping one and another get better at what they do. There are two very popular bug bounty forums: Bug Bounty Forum and Bug Bounty World.

Participate in open source projects; learn to code.
Go to https://github.com/explore or https://gitlab.com/explore/projects and pick a project to contribute to. By doing so you will improve your general coding and communication skills. On top of that, read https://learnpythonthehardway.org/ and https://linuxjourney.com/.

Help others. If you can teach it, you have mastered it.
Once you discover something new and believe others would benefit from learning about your discovery, publish a write-up about it. Not only will you help others, you will learn to really master the topic because you can actually explain it properly.

Smile when you get feedback and use it to your advantage.
The bug bounty community is full of people wanting to help others so do not be surprised if someone gives you some constructive feedback about your work. Learn from your mistakes and in doing so use it to your advantage. I have a little physical notebook where I keep track of the little things that I learnt during the day and the feedback that people gave me.


Learn to approach a target.
The first step when approaching a target is always going to be reconnaissance — preliminary gathering of information about the target. If the target is a web application, start by browsing around like a normal user and get to know the website's purpose. Then you can start enumerating endpoints such as sub-domains, ports and web paths.

A woodsman was once asked, "What would you do if you had just five minutes to chop down a tree?" He answered, "I would spend the first two and a half minutes sharpening my axe."
As you progress, you will start to notice patterns and find yourself refining your hunting methodology. You will probably also start automating a lot of the repetitive tasks.

Related links


  1. Growth Hacking Que Es
  2. Hacking Iphone
  3. Curso De Hacker Gratis Desde Cero
  4. Curso Growth Hacking
  5. Tools Hacking
  6. Hacking Social
  7. Machine Learning Hacking
  8. Machine Learning Hacking
  9. Hacking Games Online
  10. Hacking Growth

Workshop And Presentation Slides And Materials

All of our previous workshop and presentation slides and materials are available in one location, from Google Drive.

From now on, we are only going to keep the latest-greatest version of each talk/workshop and announce changes on Twitter.

More information


  1. Hacking Curso
  2. Paginas De Hackers
  3. Herramientas Hacking Android
  4. Escuela Travel Hacking
  5. Paginas De Hackers
  6. Marketing Growth Hacking

Security Surprises On Firefox Quantum

This morning I've found an scaring surprise on my Firefox Quantum. Casually it was connected to a proxy when an unexpected connection came up, the browser  was connecting to an unknown remote site via HTTP and downloading a ZIP that contains an ELF shared library, without any type of signature on it.

This means two things

1) the owner of that site might spread malware infecting many many people.
2) the ISP also might do that.


Ubuntu Version:


Firefox Quantum version:


The URL: hxxp://ciscobinary.openh264.org/openh264-linux64-0410d336bb748149a4f560eb6108090f078254b1.zip


The zip contains these two files:
  3f201a8984d6d765bc81966842294611  libgmpopenh264.so
  44aef3cd6b755fa5f6968725b67fd3b8  gmpopenh264.info

The info file:
  Name: gmpopenh264
  Description: GMP Plugin for OpenH264.
  Version: 1.6.0
  APIs: encode-video[h264], decode-video[h264]

So there is a remote codec loading system that is unsigned and unencrypted, I think is good to be aware of it.

In this case the shared library is a video decoder, but it would be a vector to distribute malware o spyware massively, or an attack vector for a MITM attacker.


More articles


Monday, April 20, 2020

Linux Command Line Hackery Series - Part 6


Welcome back to Linux Command Line Hackery series, I hope you've enjoyed this series so far and would have learned something (at least a bit). Today we're going to get into user management, that is we are going to learn commands that will help us add and remove users and groups. So bring it on...

Before we get into adding new users to our system lets first talk about a command that will be useful if you are a non-root user.

Command: sudo
Syntax: sudo [options] command
Description: sudo allows a permitted user to execute a command as a superuser or another user.

Since the commands to follow need root privileges, if you are not root then don't forget to prefix these commands with sudo command. And yes you'll need to enter the root password in order to execute any command with sudo as root.

Command: useradd
Syntax: useradd [options] username
Description: this command is used for creating new user but is kinda old school.
Lets try to add a new user to our box.
[Note: I'm performing these commands as root user, you'll need root privileges to add a new user to your box. If you aren't root then you can try these commands by prefixing the sudo command at the very beginning of these command like this sudo useradd joe. You'll be prompted for your root password, enter it and you're good to go]

useradd joe

To verify that this command has really added a user to our box we can look at three files that store a users data on a Linux box, which are:

/etc/passwd -> this file stores information about a user separated by colons in this manner, first is login name, then in past there used to be an encrypted password hash at the second place however since the password hashes were moved to shadow file now it has a cross (x) there, then there is user id, after it is the user's group id, following it is a comment field, then the next field contains users home directory, and at last is the login shell of the user.

/etc/group  -> this file stores information about groups, that is id of the group and to which group an user belongs.

/etc/shadow -> this file stores the encrypted password of users.

Using our command line techniques we learned so far lets check out these files and verify if our user has been created:

cat /etc/passwd /etc/group /etc/shadow | grep joe


In the above screenshot you can notice an ! in the /etc/shadow, this means the password of this user has not been set yet. That means we have to set the password of user joe manually, lets do just that.

Command: passwd
Syntax: passwd [options] [username]
Description: this command is used to change the password of user accounts.
Note that this command needs root privileges. So if you are not root then prefix this command with sudo.

passwd joe


After typing this command, you'll be prompted password and then for verifying your password. The password won't show up on the terminal.
Now joe's account is up and running with a password.

The useradd command is a old school command, lets create a new user with a different command which is kinda interactive.

Command: adduser
Syntax: adduser [options] user
Description: adduser command adds a user to the system. It is more friendly front-end to the useradd command.

So lets create a new user with adduser.

adduser jane


as seen in the image it prompts for password, full name and many other things and thus is easy to use.

OK now we know how to create a user its time to create a group which is very easy.

Command: addgroup
Syntax: addgroup [options] groupname
Description: This command is used to create a new group or add an existing user to an existing group.

We create a new group like this

addgroup grownups


So now we have a group called grownups, you can verify it by looking at /etc/group file.
Since joe is not a grownup user yet but jane is we'll add jane to grownups group like this:

addgroup jane grownups


Now jane is the member of grownups.

Its time to learn how to remove a user from our system and how to remove a group from the system, lets get straight to that.

Command: deluser
Syntax: deluser [options] username
Description: remove a user from system.

Lets remove joe from our system

deluser joe

Yes its as easy as that. But remember by default deluser will remove the user without removing the home directory or any other files owned by the user. Removing the home directory can be achieved by using the --remove-home option.

deluser jane --remove-home

Also the --remove-all-files option removes all the files from the system owned by the user (better watch-out). And to create a backup of all the files before deleting use the --backup option.

We don't need grownups group so lets remove it.

Command: delgroup
Syntax: delgroup [options] groupname
Description: remove a group from the system.

To remove grownups group just type:

delgroup grownups


That's it for today hope you got something in your head.
Continue reading